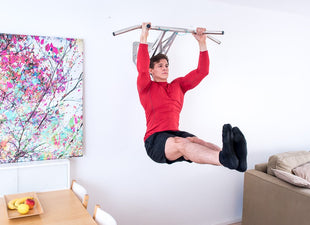
There are now many types of pull-up bars - for the door frame, for the ceiling, the garden, freestanding and for the wall. In the following article, we want to introduce you to our pull-up bar Pullup & Dip especially for wall mounting. We will give you important tips on what to consider in general, how the installation is best done, what advantages it offers and what is included. Let's get started right away!
A pull-up bar for the wall is usually mounted on interior walls in the apartment and firmly screwed. Occasionally, there are also pull-up bars that are made of stainless steel or are specially coated to not rust and are therefore also suitable for outdoor mounting, more about this later. With our pull-up bar for home we have deliberately chosen a wall mounting. Due to the design and the feature that the bar can also be used for outdoor training, mounting on the door frame or ceiling is not possible.
Important in advance:
Since there are some points to consider before you get a pull-up bar for wall mounting, we would like to point out these points in advance.
Load capacity: In order to ensure an appropriate load capacity, a high-quality processing is a basic requirement. This means above all clean welds and a sufficiently stable construction.
Wall condition: The bar itself and the pull-up bar screws can still be so stable. If your wall is not suitable for it, everything brings you nothing. Therefore, check in advance with the janitor, landlord or specialist whether your wall offers sufficient stability.
Workmanship: In addition, there should be no pointed or sharp edges so that you do not injure yourself during training.
Load capacity: Before buying a pull-up bar, always check the load capacity so that it can withstand your weight and your planned exercises.
Fasteners: Just as important as the stability of the pull-up bar itself is the stability of the fasteners. It doesn't make sense to spend a lot of money on a bar but skimp on the screws and risk them breaking out of the wall. Rather spend a little more for sufficiently stable and long fastening screws.
Mounting location: Almost all pull-up bars for wall mounting are firmly screwed to the wall, so you should think carefully in advance where you want to place it, so that it does not get in the way in the long term in the apartment or basement. Once screwed on, it can't be removed in a hurry.
Ceiling height: Make sure that you mount the pull-up bar at a sufficient height so that you still have enough space to the ceiling and do not bump your head against it. To avoid having to bend your legs, we recommend that you mount the bar high enough.
Clarify installation with landlord: If you live in the rent, it is recommended to clarify the pull-up bar wall mounting in advance with the landlord, since this can leave depending on the installation clear traces in the wall. This way you are on the safe side.
Clarify the course of power/water lines: Clarify in advance whether there are water or power lines behind the wall where you want to mount your pull-up bar. Damage to these would be very annoying and expensive.
Advantages of a pullup & dip bar for wall mounting
Let's get straight to the advantages. A big advantage of the pull-up bar wall mounting is that this type of mounting is very stable and you do not have to worry about slipping out, for example, pull-up bar for the door frame or between the door, if properly installed. In addition, pull-up bars for wall mounting offer a higher load capacity than pull-up bars for the door. With our bar, you can train up to a body weight of 130kg without any problems.
A wall-mounted pull-up bar does not damage the door frame, but of course the installation leaves traces on the wall, which can be removed with putty and a little paint.
Ordinary pull-up bars are firmly screwed to the wall and can take up a lot of space, get in the way and also make the apartment look "unsightly". For this reason, as well as the reversible function for dips, we decided to design the system based on an adapter suspension system. This means that only the wall adapter plate has to be screwed to the wall, but the bar itself can be hooked in and out. When not in use, it can be removed from the adapter and stored away.

Due to the welded dip bars, the pull-up bar offers many different grip options so that you can train pull-ups optimally from different angles. The two dip bars are welded in a V-shape and thus allow a wide or narrower grip.
Due to the flexibility and the dip function are many different pull-up bar exercises for different muscle groups, so you can train not only pull-ups, but also your entire upper body. You can find more detailed information below.
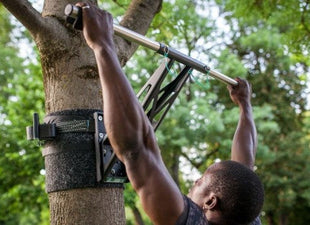
Our pull-up bar can be mounted on indoor as well as outdoor walls. This also allows you to mount it on an outside wall in the garden, so you can train outside in good weather.
A locking pin protects the bar against slipping out of the adapter and thus serves as a safety especially during jerky movements such as muscle-ups.

During the development we also thought about calisthenics athletes, who use most of the straight pull-up bars prefer. With the optional straight bar, which serves as an extension, you can also complete your exercises with a straight bar. This is especially suitable for muscle-ups or pull-ups.

[product="P-00060-INDOOR"]
Assembly of our pull-up bar for wall mounting
We recommend only brick and concrete walls for wall mounting our pullup and dip bar. Other types of walls, such as sheetrock walls, will not withstand the high forces that occur under load. Also, as already mentioned, make sure that you have enough distance to the ceiling so that you don't bump your head against it. Regarding the mounting height, we recommend that you mount the bar a little higher for pull-ups. This way, you don't have to bend your legs for pull-ups and can simply jump up a bit for dips. However, we can not give an optimal installation height, because each person has different proportions. It is best to hold the bar against the wall in advance and find the height that suits you.
So that you do not need an additional person for the pull-up bar wall installation and also before final installation can see how high the final height is, we have developed a drilling template that simulates the wall adapter and which you can align with a spirit level, stick to the wall and through which you can also drill. So you save the annoying marking of drill holes.

Assembly procedure - Required material:
- Drilling template Pullup & Dip + adhesive strips for fastening
- Indoor adapter
- Spirit level
- Impact drill
- Hammer
- 2 x drill bits (5 mm for pre-drilling and 10 mm for final diameter)
- inch rule
- 1 x wrench 13 mm
- 7 x fischer long-shaft dowel (or similar)
- Vacuum cleaner

Assembly steps:
- The distance from the top edge of the indoor adapter (see drilling template) should be at least 45 cm to the ceiling. Align the drilling template very precisely with the spirit level and fix it to the wall with adhesive tape. Depending on your height, you can determine the desired height yourself.
- After fixing the drilling template to the wall, now pre-drill all seven holes on the drilling template with the 5 mm drill bit. Then drill the seven holes to the final diameter using the 10 mm drill bit. The drilling depth should be at least 110 mm. Now remove the drilling template from the wall again and vacuum out the drill holes well with a vacuum cleaner or blow them out with a blower. Press the indoor adapter over the holes on the wall, tap the dowels in carefully with a hammer and then screw the screws tightly with the wrench.
Tip:
For concrete or reinforced concrete walls, after drilling with the 10 mm drill bit, drill the hole an additional 2-3 in and out movements so that the dowel has enough room.
A detailed video on the wall mounting of our Pullup & Dip bar can be found here:
What exercises can be done with the indoor pullup & dip chin-up bar/dip bar?
The bar offers you many possible exercises like of course pull-ups, dips and leg lifts. But also other exercises like muscle-ups with enough ceiling height, L-hang, L-sit, reverse deadlift, toes-to-bar, bodyweight rowing, handstand or other types of pull-ups like archer-pull-ups or typewriter pull-ups are possible. In addition, you can attach a pull-up band, gymnastic rings or a sling trainer to the tube of the outrigger or the two multi bars.
Just watch our video where we show you a series of pull-up bar exercises.
Scope of delivery
Let's get to the last punk, the scope of delivery. Our Pullup & Dip pullup and dip bar for wall mounting comes including the bracket (1), the adapter plate for the wall (2), the two combi bars for pullups and dips (3) as well as the mounting screws (4) for wall mounting and a drilling template and instruction manual.

For feedback on the product we are always very open. Please leave us your suggestions for improvement. If you are also interested in outdoor training and are looking for a pull-up bar for the garden or the park, our transportable professional pull-up bar for indoor & outdoor could be the right thing for you.
We wish you a successful workout and great progress!
Are you looking for a pull-up bar to effectively train pull-ups at home?
We at Pullup & Dip offer you high quality pullup and dip bars for home and garden.

Recommended items:
Pullup bar for the garden - pullups even outdoors
Buy pull-up bar for door, ceiling or wall? Advantages and disadvantages



Leave a comment
All comments are moderated before being published.
This site is protected by hCaptcha and the hCaptcha Privacy Policy and Terms of Service apply.